Edit/update QuickPicks in Backup 3  2
2
If you’re a Mac user and the owner of a .Mac account you’ll have no doubt noticed that Apple have increased your online storage (to 1GB) and have released a new version of Backup.
 The previous version of Backup was useable but lacked quite a bit in terms of usefulness. This new incarnation, however, isn’t too bad at all.
One problem that I did come across is the fact the “QuickPicks” don’t work if your files aren’t in the default place, e.g. I’ve moved my iTunes and iPhoto folders to my external hard drive and therefore Backup can’t see them. Sure, I can just select them as a standard folder, but what if I just want to backup the music I’ve purchased from the iTunes Music Store or just my playlists?
Well, thanks to a tip on macosxhints, I can update the default QuickPicks to suit my needs.
Safety first
First off, I wanted to make copies of all the files I was about to change just incase it all went catastrophically wrong. Just for reference, my internal hard drive (i.e. the one which OS X boots from) is named “Hard one” and my external hard drive is “Hard too” … because I think I’m funny.
So, some easy steps:
- create a new folder in the desktop and name it ‘Original QuickPicks’;
- navigate to ‘Hard one -> Library -> Application Support -> Backup -> QuickPicks’;
- left-click on the first ‘QuickPick’ file to be edited and then Command+left-click on all the others;
- drag all these files into the ‘Original QuickPicks’ folder on the desktop;
Now, this will have removed the soon-to-be-edited QuickPick files from their original location and therefore Backup can no longer use them. We now need to edit them to suit our needs and put them back where Backup can use them.
So, a few more simple steps:
- open the ‘Original QuickPicks’ folder on the desktop;
- select ‘Select All’ from the ‘Edit’ menu;
- select ‘Copy x items’ from the ‘Edit’ menu (‘x’ will be the number of files in the ‘Original QuickPicks’ folder);
- navigate to ‘Home -> Library -> Application Support -> Backup’;
- if the ‘QuickPicks’ folder doesn’t exist within the ‘Backup’ folder then you need to create it;
- navigate into the ‘QuickPicks’ folder;
- select ‘Paste items’ from the ‘Edit’ menu;
Now you should have exact copies of the QuickPick files that are in the ‘Original QuickPicks’ folder.
Editing a QuickPick
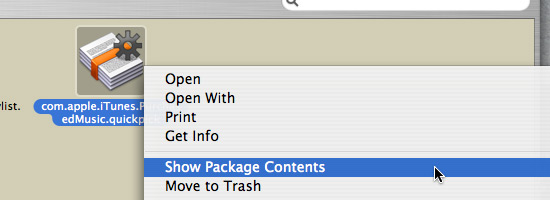
Decide which QuickPick you want to edit first - the filename tells you which is which. I chose com.apple.iTunes.PurchasedMusic.quickpick which (fairly obviously) is the QuickPick for the music I’ve bought from the iTunes Music Store.
First we need to get inside the QuickPick, so Control+click the file (or right-click if you have a two button mouse) and select ‘Show Package Contents’ from the context menu:
Then in the resulting Finder window, navigate to ‘Contents -> Versions -> 1.0 -> Resources’. There you will find one or more folders and a file named DefinitionPlist.strings - Control+click this file, select ‘Open With’ from the context menu and click on ‘Other’:
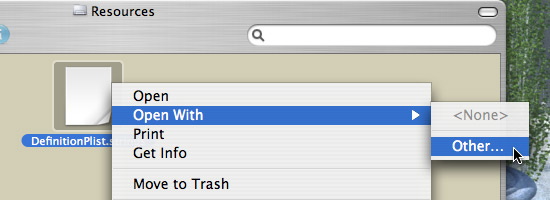
This will open a file dialog for you to select which application you want to open the file with. The list of applications shown will be those stored in your main ‘Applications’ folder, so assuming that’s where ‘TextEdit’ is stored (it is by default) scroll down the list and select it:
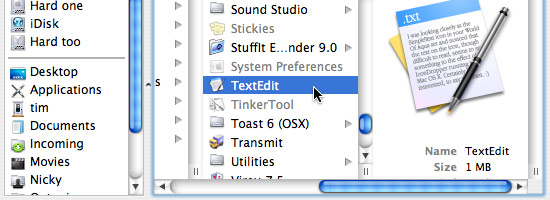
Note that the icon for TextEdit on my system is different to the default, so don’t panic and think you’ve got the wrong application.
Now you should have a TextEdit window open with the contents of ‘DefinitionPlist.string’ on show:
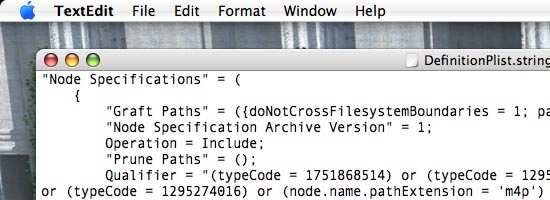
The third line (the one that starts with "Graft Paths" ...) is the one to change. The original path information points to the iTunes folder in the Music folder that’s in my Home folder:
"~/Music/iTunes"
And I need to change it to the iTunes folder stored on my external hard drive:
"/Volumes/Hard too/iTunes"
No more changes are needed to this file so it can be saved and closed.
If needed, you can also change the name and description of the QuickPick that is shown in Backup. To do this, go to the Finder window showing the ‘DefinitionPlist.sting’ file and navigate into ‘English.lproj’ and open the ‘InfoPlist.string’ file in TextEdit as described above:
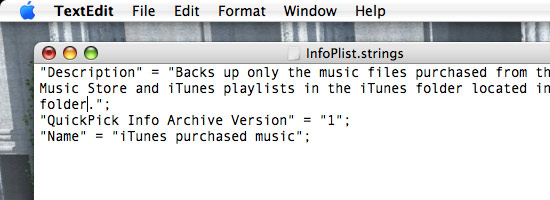
Change the description and name to whatever you want and then save and close the file.
Repeat all this to edit any other QuickPick files you want to change.
All done
This should be all that’s needed - you can now open Backup and use your newly edited QuickPicks:
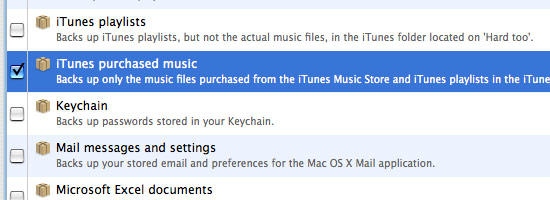
You can use this procedure to create you own QuickPicks based on how you have you system organised.
More information
A few companies and people have been releasing QuickPicks for their own and other people’s application files, e.g. Delicious Monster for their Delicious Library and Wishingline Design Studios for NewsFire RSS, Transmit and a few others.
John Hugg also has a page of FAQs with plenty of useful information.
 If I want to backup all of a particular applciations files, how I do get the 10 digit numeric equivalent for the Type and Creator that is used in the QuickPicks such as for MS Excel or Word? - Robert Ameeti
Robert : unfortunately I don’t know how to find type and creator codes for applications - I think there is a list but it’s not widely published, probably to restrict access by people who’re looking to write viruses and what not. I tried to find this information myself about a month when trying to change the icon for certain file types and got absolutely nowhere then - I trawled Google and a few other search engines but couldn’t find a list of any kind. The only thing I did discover was that if you’re developing your own application and you need to create your own creator or type codes you can ask Apple and they’ll tell you whether the codes you’ve chosen already exist or not - obviously this is useless information for what you’re asking! - Timmargh
Comments